Model bases (adhesive tile)
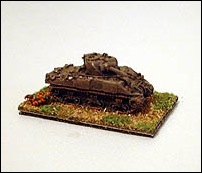 GHQ Sherman on a base. The base is 20 mm x 30 mm. |  German infantry squad (GHQ) part way through basing, waiting for the green flock powder. |
Introduction6 mm figures are tiny and are virtually impossible to handle individually in wargames. So they are normally based in groups. For example, in standard Crossfire, a base about 30 mm square is used for an infantry squad. This represents up to ten men. I normally mount about six figures or one vehicle to a base.
I have played round with a variety of ways of basing models. I used to use sticky backed floor tiles. These allow you to base your models very quickly, but have some downsides:
- if I use large bases (say 75 mm square) and don't apply the magnetic sheet to the underside the base can warp. And it ends up concave, which looks worse than if it was convex.
- they are quite light
- The varnish can darken flock powders significantly, so everything looks as if the ground is sodden.
Because of this I'm now making future bases like Derek Hodge does: see http://www.hodgenet.co.uk/GA/howtobase.htm
Have a look at this page to see my attempts at this: MDF bases
If you are still interested in the quick-and-easy adhesive tile method, read on.
The floor tiles
I like "Focus Basics 6 self-adhesive vinyl floor tiles". These are available from Focus in the the UK, and are 305 mm x 305 mm. The front surface is smoothish plastic, the back is black sticky stuff with a peel-off paper covering.
Westco do some similar tiles...avoid them, they bend too easily!
How to base
See the photos to the left. In this example I am basing a GHQ German Mk. IV.
Cut the correct size of base. I do this by scoring through the paper backing on the sticky side of the tile, and then flexing it until it snaps. | 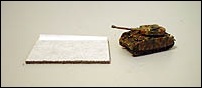 Cut piece of floor tile, with a GHQ Mk IV. |
Remove the paper backing from everywhere except the regions where there will be exposed ruts from the tracks (precut the paper with a craft knife, using the model as a template). | 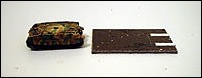 Remove paper from everywhere except the exposed ruts. |
Push the tank down so that it sticks in the adhesive. Add brown earthy flock. I currently use Javis dark earth. Push the flock down a bit to make sure it sticks. Add small amounts of PVA glue sparingly, and stick on grass flock (I like the very fine grade Gaugemaster light green foliage). Add bushes, rocks as necessary. | 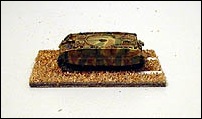 Push the vehicle down until it sticks, then flock with earthy brown. |
Peel off the paper strips and paint the exposed adhesive brown. Give them a good spray of matt varnish. I use Krylon (see the links page for details). | 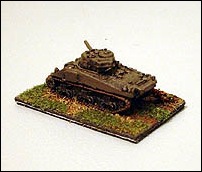 Sparingly apply glue and add grass flock and bushes. Peel off the strips of paper and then paint ruts brown. Gosh, the Mk IV has turned into a Sherman! |
Eagle-eyed readers will notice that the Sherman bases appear thicker than that of the Mk IV. They are. They have a layer of magnetic strip stuck on so I can transport them safely held to steel paper lined video cases.
One advantage of this is that you can use the magnet to attach a unit label (see the magnetic markings section on the 6 mm models > Magnetic markings page).