
Terrain 2 - depressions, bocage/hedges
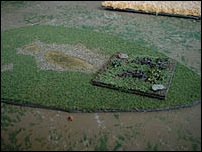 British 2" mortar team (GHQ) hiding in a depression. | 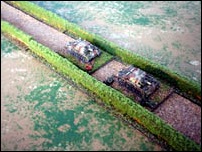 A pair of StuG III move down a country lane with hedges (old style). |
Depressions
I decided to put a pool of muddy water at the bottom of each depression to make them stand out from broken ground and other terrain.
As usual, I started off with some "Focus Basics self-adhesive floor tile". I cut it into the appropriate shape, peel off the backing paper, and then scrape off the glue from the pool area. I lob the thing into Javis brown flock powder, then put on some PVA glue and shake on some Gaugemaster light green flock powder for grass. A bit of browny grey paint into the pool, followed by some gloss varnish, and you are done.
 Panzer IVs (GHQ) moving along a new style road with hedges. | 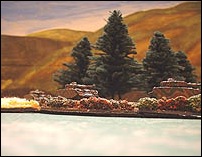 Another view of the Panzer IVs on the road with "new" hedges. The hills are a backdrop for railway modellers. |
Bocage/hedges
I initially made hedges by tearing thing strips of cork floor tile and attaching them to strips of "Focus Basics self-adhesive floor tile". I flocked the floor tile brown, put PVA glue on the hedges and then flocked the hedges with medium green Gaugemaster fine foliage.
The problem with these hedges is that they are very uniform. OK if you are modelling a stately home, but otherwise not much good!
My new hedges are made from Connoisseurs range flexible tree foliage from Javis. (See the Links page for details, and the 6 mm models > Terrain 1 page for some more pictures of this stuff in use). It is a sort of rubbery mass of pieces of coloured cork.
I normally do this to make roads with hedges at their edges:
1. Cut a piece of self-adhesive floor tile the appropriate width for the road (30 mm in my case - big enought to take one of my based vehicles).
2. Slice off a several bits of the flexible tree foliage, each about the thickness of the hedge, but twice the depth, and then rip it down the middle to give two ragged top hedges.
3. Peel off the paper to expose the adhesive of the floor tile. Press the hedges into place.
4. Dunk the road into a load of brown flock. It tends to look better if, before this, you drizzle some dark brown flock down the middle of the road to give a bit more variation.