
Paper buildings
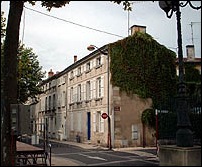 Cognac house 1. |  Cognac house model. |
Introduction
Several gamers have asked me to post the artwork for my home-made houses. So here, at last, are the files and instructions.
The wallpaper
The basic idea is to make a simple block building and wallpaper the outside of it with the images of doors, windows, etc.
The files
The Paper buildings downloads page has the files to create these.
The files are about 1MB each, so may take a while to download if you have a slow web connection.
Please note:
- I give permission to copy, print, and distribute for private use, but not for commercial use.
- If you want to publicise them, please put a link on your web page to this one, but please don’t post copies of the pdfs on your site.
- If you modify them in any way (making new variants),and post them on your site, please leave a credit to me on the pdf.
- OK?
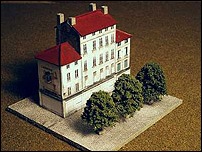 Cognac shop building. | 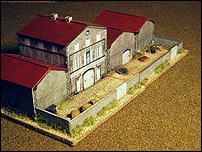 Cognac warehouse/factory. |
The two methods
There are two ways you can make the model, build-and-wallpaper or wallpaper-and-build.
Build-and-wallpaper
1 Colour print the pdf file and make some measurements of the dimensions of the walls.
2 Make a building of the correct size. You could use plastic card, foam-filled-card, expanded polystyrene, wood, or cardboard.
Don't forget the finite thickness of card. For example, the front and back walls are 40 mm long, whilst the side walls are 35 mm long. If you are using 1 mm thick plastic card you will have to cut two walls 40 mm long and two 33 mm long (assuming you are making butt joins, rather than mitreing the corners).
3 Cut the walls and roof out from the colour print and glue them to the outside of the building
Wallpaper-and-build
1 Colour print the pdf file.
2 Glue it down to some plastic sheet (say 1 mm thick).
3 Cut out the walls, roofs etc. as individual elements (i.e. the end wall is just one piece, the front is just one piece)
4 Mitre the corners of the walls so that they will joint together
5 Assemble the building.
Adhesives
My preferred material for the buildings was 1 mm thick polystyrene sheet, but now I prefer the foam-cored card material (called foam-board).
If you print using an Epson ink-jet printer, rather than a laser, you will find the ink does not run when soaked in liquid polystyrene adhesive. This means you can lay the paper on the plastic card and then brush the adhesive on the top. It soaks into the paper and bonds it to the plastic.
Roofs
I think the roofs look best if, after sticking them down, you add a rod of plastic along the ridge line. Then paint it to match the rest of the roof.
Chimneys
You will have to make your own. I find square section plastic rod is good for this. Cut off a section and then cut a V into the base. Add chimney pots to the top if you want.
Finishing touches
Touch up the edges with paint to hide any plastic that shows through. Paint your chimneys too.
Two fronts?
You will notice that there are often more fronts, backs, and sides than you need for one house. This allows you to choose which you like the look of.
How did I do the artwork?
I took pictures of the building as square on as I could. I then used a photo editing package to distort the walls so that they were rectangular and the correct aspect ratio. Any problems, such as parts obscured by trees, were fixed by cloning parts of the image and moving them over the offending items.
Good luck!
I hope you find the artwork file useful.
Please let me know if your buildings come out well, and if you would like me to post up more buildings.