
Hexagon terrain
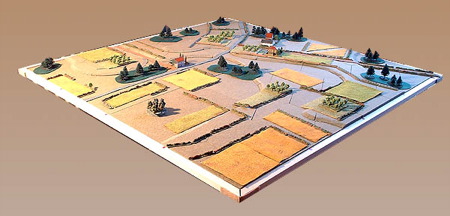
A 4 foot square table with hexagon terrain, set up for the Hit the dirt scenario "Scottish corridor"
Hexagon based scenery
The Crossfire scenario book "Hit the dirt" introduces several new scenery types, one of which is the contour line. Contour lines are important because they alter the line-of-sight rules of Crossfire, in some cases blocking visibility, and in other enabling it.You can represent contour lines by narrow cork ridges, string, and such - not very aesthetically pleasing.
So I thought about making some hexagon-based scenery like GHQ's Terrain Maker (www.ghqmodels.com), using expanded polystyrene ceiling tiles, but rejected that idea as I have always found the DIY stuff too brittle and too liable to expose white core when the surface paint gets dinged.
I had given up on the idea when I came across some suitable material for hexagons at my local DIY store (www.focusdoitall.co.uk). "Focus laminated flooring fibre underlay board" is a bit like the stuff they make pinboards out of - it is a lightweight stiff board 7 mm thick. It is a nice olive green colour throughout, is easy to cut with a craft knife, has a nice texture, and is inexpensive (20 sheets 850 mm x 590 mm x 7 mm for about 20 pounds).
I cut the contour lines on the hexagons at an angle, so that the 7 mm height increase takes place over about 10 mm. This prevents too much of a stepped appearance, yet makes the position of the contour line still obvious.
 A four foot square wargames table showing the arrangement of hexagons. | 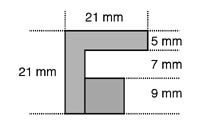 The cross-section of the edging wood. |
Dimensions
The choice of hexagon size is a compromise between flexibility and ease of manufacture. Small hexagons allow you to represent very complicated terrain, but will take you forever to cut out. After much pondering and consulting of the maps in "Hit the dirt" I decided on the hexagon size of:230 mm across points
200 mm across flats
With a couple of half-hexagons here and there this can give an area very close to the 4 foot square area used a lot in "Hit the dirt" (it actually gives 1200 mm x 1208 mm, within 1% of square).
Table top
I also made a portable table top from the fibre board. This consisted of six rectanges, these are held together by velco straps on their undersides and by wooden edging strip made from an L-section and a smaller square section, glued and nailed (see figure).The total size of the rectangles, when placed together is slightly larger than the 1200 mm x 1208 mm of the hexagons, to include the bit that fits into the wooden edging.
The wooden strips are held to each other by yet more velcro at the table corners. The edging has the added advantage that it prevents the hexagons on the surface of the board from sliding off the edges. I did think about using magnetic strip to hold the hexagons together (see figure), but so far have found that the edging and friction are enough to keep them in place.
The result is light table that is easily packed up. I haven't used it much so far; I'll let you know if it all falls apart or looks tatty!
Terrain
Previously I had made my fields, woods, etc. from floor tiles. These don't work well on a contoured battlefield as they cannot follow the undulations of the surface. I now use felt, coated with Copydex adhesive, and then flocked. These work well as the follow the contours and don't slide about.And remarkably the flock powder doesn't seem to come off...much to the delight of my wife.
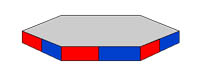 One way of using magnetic material to hold the hexagons together. The red represents magnetic sheet and the blue steel paper. |  Extreme close-up of a slope at the edge of the table. You can also see hedges, buildings and a radiator (oops!) |